Raster Deform
Tool
You can deform in image.
If you want to deform a background, you have to change it into a
layer.
You can do that by clicking with Right in your layer palette and
choose for; Layer makes of context layer.
How and what you can deform? Just try it out.
Towards index |

Crop
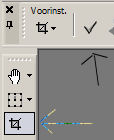
Use the crop tool to remove unwanted portions of an image.
You draw a selection around the piece that you want to keep
concerning after cutting out. You can still adjust if you want to.
If you double-click whit left afterwards it has been cut out,
or if you click on the sign that has been indicated above at
the black arrow.
Towards index
|

Move tool
You can move everything on a layer, while the others layers stay
intact.
If you hold the left mouse button pressed, you can drag it everywhere
you want.
Move a selection with your right mouse button pressed.
Towards index
|

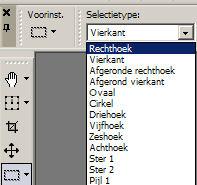
Selection
To see you therefore 3 different tools sitting.
1 = selection

You
can choose here at selection type which form you selection must
(click F4 if you do not realize this your baffle)
2 = free hand selection
For the freehand selection type, click and drag an outline of the
area you want to select.
Itself I finds "from point to point" the most pleasant to work
with.
Mark this checkbox (anti alias) to you make a smooth - edged
selection.
Each time you click with left, your line is fixed.
Do you make a mistake? By clicking Delete on your keyboard, you will return one step.
Right click to complete the selection.
3 = Magic Wand
Tool
Use the magic wand tool to select
content rather then defining edges in the image.
For example a border.
Or for example a certain color in an image. By selecting such a
color, you can take away the color (delete) or replace it by another
color, gradient or a pattern.
Towards index
|

Eye Dropper
Position the cursor over the color in the image
Left click to make this color the foreground color
Right click to make it the background color.
Also color replacer is grouped in this
tool.
Click with left on a color in your image that you want to replace
and with Right on the color to replace.
At the settings you can choose which form you wants.
How higher your tolerance, how more is replaced. So how closely with the
color you want to replace
Couple....someone have a blue trousers with red and yellow flowers.
You want to keep the flower, but the trousers himself you wants to
make green.
Then therefore you click on the blue with left and with Right you
choose a green color from the layer palette or from your image.
Have you done that , you will be pressed with Right in the
trousers and this become green, the flowers will be the same as
before.
Play with it, because it is a nice tool.
Towards index |

Paint Brush
With the brush you can do very much.
You can paint simply, but you can "stamp" also complete blades
Such a blade you calls a brush. You can download them and/or make
them yourself.
I will explain it in a later lesson.
Look at your options which possibilities you all have.
Size:
Determines the pixel size of the brush. You can adjust the
size value trough the the
tool options palette.
Hardness:
Determines how sharp the
edges
of the tool are.
Setting this to 100 gives you the sharpest, hardest
edge
Setting this to lower values gives you a softer, fading edge.
Step:
Determines the
distance placed between applications of paint during a
single (continuous) paint stroke.
Lower Step values yield a smoother, more continuous appearance.
Higher Step values yield a choppier appearance.
Density
Determines the coverage of the paint step.
At higher values this produces a complete cover: at lower values you
get more spots as though you're spraying the image.
If you uses the tool Airbrush, you must set density to
values under 100.
Thickness:
Determines how wide the brush is.
Setting thickness to 100, you get a complete round or
square brush (depending on the shape setting).
As the thickness setting decreases, the brush becomes increasingly
narrow.
Opacity
How well the paint covers the image surface
. At 100% opacity the paint covers everything.
At 1% opacity the paint is almost transparent. For the eraser tool
this settings determines the level of erasing.
Blend:
How painted pixels are blended with pixels on underlying layers..
The blend modes are the same as the blend mode of layers.
Click here for more information
Continuous
Stroke
Specifies whether paints builds up as you apply multiple strokes of
less than 100% opacity over the same area.
If this check box is marked, paint maintains a continuous color and
repainting an area has no effect.
If this checkbox is cleared (the default), each brush stroke over
the same area applies more paint: the color darkens until it reaches
100% opacity.
Wet Look Paint:
Mimics wet painting with soft colors
inside
and a darker ring at the edge.
Decrease the hardness setting from its maximum of 100% to see the
effect.
Paint Behind:
Works on layered images only. Wheb a layer
is selected, Paint Behind paints behind the data currently on that
layer
No paint will be visible when the topmost layer and active layer are
both fully opaque.
Towards index |

Clone
Click with Right in the part which you want to clone, with left
you clone that what you wants.
Aligned mode; The clone brush tool paint from the point of the
source area relative to the first point you clicked on the target
area each time you stop and start painting again.
Sample merged: Clone data from all layers merged together
Scratches remove: draw with the tool a selection around the
scratches on the photograph. If you release the button the scratch that's in the selection will be delayed
Are there a lot of scratches?
Go to > Enhance photo > automatic small scratch remover
Towards index |

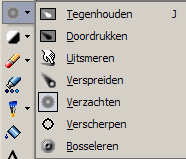
Brush
moderates
This brush uses areas or edges in your image what needs to be
updated.
With Dodge you make the part of the image your go on, a little
lighter.
Burn does correctly the reverse and makes it therefore darker.
With Soften you can moderate the edge of a tube even what less sharp
to make
Emboss: It lets the forefront from the context come up oppressing
color and in black edges to trace
Towards index |

Eraser
The eraser speaks for itself, I think. At the options for tools you
can choose for a round gum or another form and the size of your eraser.
The background eraser is something very different. Can certain colors
remove. Such as for example the sky around a church turret.
You just have to try it.
Read here more about the
background eraser
Towards index |

Picture Tube
Picture Tubes are transparent
images, which can be introduced with the tool Picture tube on a
background or a layer.
I always advise to put a tube on a new raster layer, so you can
still move it.
I have stored my tubes in a folder as called PSP-tubes, which I can
open when I need it.
If I put each tube I have in my Picture tube map, it lasts an
hour before PSP is started, because he will charge them all then.
However..my water mark (signature) is in it, because I use these
very much.
The options mean the following:

1: Click on the dart: here find you
everything what you have in your Picturetube; you can choose between
large and small pictograms
2: The properties of the chosen item
3: Scale: percentage for increasing and reducing: of 10 - 250%
4: Step: the distance in pixels is (1 up to 500) between the middle
of each blade brush
5: Placement mode:
6: Selection mode:
Later I will learn you in a lesson how
to make a picture tubes and stores it.
Towards index
|

Oil Painting
Brush
Here you can make beautiful paintings.
Here too applies... try it simply all out
Perhaps skilful to tell you what all settings does:
-
Shape: choises include round or square.
-
Size: defines the size of the tool
head in pixels.
Thickness: Defines the aspect ratio of the tool head.
This setting is only active when the fixed angle head
tracking option is chosen.
-
Rotation: Defines the angle of head rotation in degrees.
-
Head
Tracking: choose track path to have the brush head bend around
the path of the stroke, or choose fixed angle to have
the brush head remain at a fixed angle.
-
Head
Loading: Defines (in percentage) the amount of material on the brush at
the start of the stroke.
-
Viscosity: Defines the rate at which the material on the brush is applied, and
thus the length of the Stroke before your paint runs out.
-
Firmness: Defines the amount of splay how the rendered lines gets wider
with more pressure, and how well it penetrates the surface on to
which it is painting .
-
Bristle size: Defines
the bristle size affects the underlying noise function for
texture and application of paint.
-
Reloading: The
method by which the brush is reloaded after a stroke. As note
above this could evolve requiring the user to pick up paint from
the canvas or mixer , automatically reloading , cleaning and
reloading the brush or other options.
-
Autoclean (check
box): when marked this checkbox
simulates cleaning the brush and dipping it in fresh paint at
the start of a new stroke. When
unchecked, the brush head is not
cleaned at the start of the stroke. In stead the dirty
head has a small amount of the current color added to whatever
dirty head state exists from the previous stroke.
-
Clean (button):
click this button to clean the head and make a new stroke
with new painting or new pigment. This button is only active
when the auto clean box is not marked.
-
Trace (check
box):
when marked, the current Art Media tool will select the pigment/paint color by sampling
the data below the center of the brush regardless of
the layer type. When you hold down the mouse button to begin the stroke,
note that a single sample is performed, and the resulting color is
used for the duration of the stroke.
Notice:
The auto clean check box
and the clean button are only available with the tools
Oil brush and palette knife.
This tool has many possibilities. You can mix colors. Click on
shift + F6 to get your mixing panel in your screen.
In later tutorials I will get further on to this.
Towards index |

Floodfill
You can fill a selection or a layer
with the foreground or background color, pattern or
gradient.
Click with your left mouse button to fill with the forefront color.
Click with Right to fill with the background color.
Towards index
|

Text tool
With texts you can do splendid things.
Comment on a photo is just one example.
You can make you text in several ways.
Floating:
Raster text as a floating selection. This type of text can be placed
the bests on its own raster layer because else the text will be
merged with the current layer. As a result, the text would be very difficult
to edit.
Vector:
Vector creates text that resides on a vector
layer. This is the most editable form of
text
Selection:
Creates a selection marquee in the
shape of the text characters.
They can simply be moved.
You can treat the selection as you would any made from the selection
tools in that it can be moved, copied, filled etc...
If you add a drop shadow to an empty selection, you will get a
watermark.
Direction:
you can choose if you want to placed the text horizontal or
vertical.
Character
types:
There are standard a considerable
number of characters in PSP. A character type also is called a
font.
There are thousands of downloads on Internet of these fonts. You do
not have to store them all in PSP or in windows.
You make a folder on your pc where you put all downloaded fonts in.
If you want to use one of the fonts, you go to that folder and open the
font.
Then you minimize it (make small, so that it's only still visible at
the bottom) and it will appears in your list in PSP.
There it will stay until you close it. By doing it this way you
diminish the overload of your pc.
At size you determe the size of the character.
region breadth:
The flood fill of your text character shall always have your
background color, gradient or pattern.
If you want a border on your text character with the forefront color,
determine on the stroke breadth how thick the border must be.
In later lessons I will
return to this, how you can make a text for example around a shape.
Towards index |

Preset Shapes
You can use the tool
preset shapes to sign all kinds of shapes and symbols. That can be
on a raster layer or on a vector layer.
Style preserves:
Don't mark the selection box in the palette
options for tool if you
want to define the properties of and the filling of the form .
If this option has been eliminated, the preset shapes are signed with
the
current properties for forefront/brushed and/or context/filling as
established in the palette material.
If you want the preset shape looks just like the way as
in the list with forms, you mark the selection box style to
preserve.
If you select this option, the institutions of the palette material
are ignored.
Couple of other options for the tool in:
-
On vector make:
Select this option to place the object on the current
vector layer. If there is no vector layer, a vector layer is
made for
this object. If you do not select this option, the form will be
placed on a raster layer.
-
Line style:
Choose in the choice list a style for
the stroke of the preset shape. For an ordinary line you
choose + leveled.
-
Breadth:
Establish the stroke breadth in
pixels.
-
Anti-alias:
Select this option on the object, the edges become more fluent.
-
To link:
Choose one of the three connection types. With contumacy angle (comes
the
institution contumacy limit available) becomes the angles
sharper.
With round angle the angles are wound up.
And with the last you make a beveled connection.
-
Contumacy
limit: (Only available if you choose contumacy angle) you
can establish the angle for contumacy angles.
With lower values you make less sharp connections and with
higher
values the connections become sharper.
Towards index
|

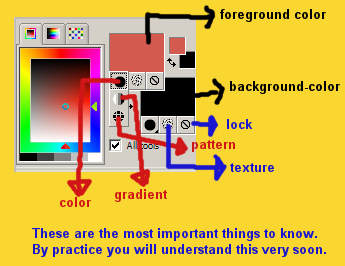
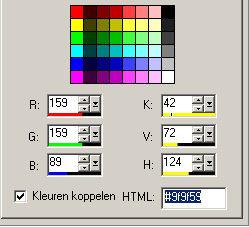
Color palette

If you must fill in a color code
A click with left in your forefront color (or background color)
gives
you
this screen (this is only one bit of that screen)
At HTML stands a code.
If you change that code in the given up code, your color
changes also
According to me I here now explained enough to start whit PSP 9
If you have questions, you can always e-mail me.
Off course I don't know everything, for that the program is too
extended
But I will always try to help you.
A lot of success!
Towards index
|
| |
 |
|
![]()


